Installation of Apache Spark on Ubuntu VM Server on Azure
Create VMs
First step is to create VMs on Azure, I am not going into the details of that. Once done, please try to remember the User ID and password.
Installation of Putty
In order to login to the box, we need to install the putty for windows, i used the link below
http://www.chiark.greenend.org.uk/~sgtatham/putty/latest.html
After installation, open putty and enter the public IP address as below and it will open a screen where it will ask the username and password. I have not set up password less authentication yet on the VMs

Download Spark into desired folder
For that we need to first create the folder where we want the binary download of spark to get downloaded
login as: plasparkadmin
plasparkadmin@13.65.203.139's password:
plasparkadmin@13.65.203.139's password:
Welcome to Ubuntu 14.04.5 LTS (GNU/Linux 4.4.0-72-generic x86_64)
* Documentation: https://help.ubuntu.com/
System information as of Tue Apr 11 18:55:11 UTC 2017
System load: 0.24 Memory usage: 0% Processes: 87
Usage of /: 40.9% of 1.94GB Swap usage: 0% Users logged in: 0
Graph this data and manage this system at:
https://landscape.canonical.com/
Get cloud support with Ubuntu Advantage Cloud Guest:
http://www.ubuntu.com/business/services/cloud
0 packages can be updated.
0 updates are security updates.
Your Hardware Enablement Stack (HWE) is supported until April 2019.
The programs included with the Ubuntu system are free software;
the exact distribution terms for each program are described in the
individual files in /usr/share/doc/*/copyright.
Ubuntu comes with ABSOLUTELY NO WARRANTY, to the extent permitted by
applicable law.
plasparkadmin@pal-dev-vm-01:~$ cd ..
plasparkadmin@pal-dev-vm-01:/home$ ls
plasparkadmin
plasparkadmin@pal-dev-vm-01:/home$ cd plasparkadmin/
plasparkadmin@pal-dev-vm-01:~$ mkdir work
plasparkadmin@pal-dev-vm-01:~$ ls
work
plasparkadmin@pal-dev-vm-01:~$ chmod 777 -R work
plasparkadmin@pal-dev-vm-01:~$ ls
work
plasparkadmin@pal-dev-vm-01:~$ cd work
plasparkadmin@pal-dev-vm-01:~/work$ wget http://d3kbcqa49mib13.cloudfront.net/sp ark-2.1.0-bin-hadoop2.7.tgz
--2017-04-12 16:55:57-- http://d3kbcqa49mib13.cloudfront.net/spark-2.1.0-bin-ha doop2.7.tgz
Resolving d3kbcqa49mib13.cloudfront.net (d3kbcqa49mib13.cloudfront.net)... 54.23 0.5.90, 54.230.5.79, 54.230.5.12, ...
Connecting to d3kbcqa49mib13.cloudfront.net (d3kbcqa49mib13.cloudfront.net)|54.2 30.5.90|:80... connected.
HTTP request sent, awaiting response... 200 OK
Length: 195636829 (187M) [application/x-tar]
Saving to: ‘spark-2.1.0-bin-hadoop2.7.tgz’
100%[======================================>] 195,636,829 26.2MB/s in 7.7s
2017-04-12 16:56:05 (24.1 MB/s) - ‘spark-2.1.0-bin-hadoop2.7.tgz’ saved [1956368 29/195636829]
Now extract the downloaded file as follows
plasparkadmin@pal-dev-vm-01:~/work$ ls
spark-2.1.0-bin-hadoop2.7.tgz
plasparkadmin@pal-dev-vm-01:~/work$ tar -xvf spark-2.1.0-bin-hadoop2.7.tgz
Download Java
Go to the Oracle site and download JDK 8, in my case from the ssh I did
wget --no-cookies --no-check-certificate --header "Cookie: gpw_e24=http%3A%2F%2Fwww.oracle.com%2F; oraclelicense=accept-securebackup-cookie" "http://download.oracle.com/otn-pub/java/jdk/8u121-b13/e9e7ea248e2c4826b92b3f075a80e441/jdk-8u121-linux-x64.tar.gz"
The above command should download and install the latest version of JAVA.
extract it with the command : tar xzf jdk-8u121-linux-x64.tar.gz
Setting Environment Paths
We need to set up JAVA_HOME, SPARK_HOME AND HADOOP_HOME as below from the command line
plasparkadmin@pal-dev-vm-01:~$ export JAVA_HOME=/home/plasparkadmin/work/jdk1.8.0_121
plasparkadmin@pal-dev-vm-01:~$ export PATH=$JAVA_HOME/bin:$PATH
plasparkadmin@pal-dev-vm-01:~$ echo $JAVA_HOME
/home/plasparkadmin/work/jdk1.8.0_121
plasparkadmin@pal-dev-vm-01:~$ export SPARK_HOME=/home/plasparkadmin/work/spark- 2.1.0-bin-hadoop2.7
plasparkadmin@pal-dev-vm-01:~$ export PATH=$SPARK_HOME/bin:$PATH
plasparkadmin@pal-dev-vm-01:~$ echo $SPARK_HOME
/home/plasparkadmin/work/spark-2.1.0-bin-hadoop2.7
plasparkadmin@pal-dev-vm-01:~$ export HADOOP_HOME=/home/plasparkadmin/work/spark -2.1.0-bin-hadoop2.7
plasparkadmin@pal-dev-vm-01:~$ echo $HADOOP_HOME
/home/plasparkadmin/work/spark-2.1.0-bin-hadoop2.7
It might be prudent to set up the above paths into .profile along with .bashrc
Command : vi ~/.profile
After opening scroll to the end of the file and press CNTRL + I, this will open the file in insert mode.
Type the paths in and then press ESC when done. This will change the file from Insert mode to normal mode.
To save and exit the file type = :x
To quit without saving type= :q
Install Python Tools
To make python development interactive, we might need to install some python development tools like iPython and Jupytar notebook. Here is a site below which had detailed instructions on how to get that done and I was able to follow that with ease.
https://www.digitalocean.com/community/tutorials/how-to-set-up-a-jupyter-notebook-to-run-ipython-on-ubuntu-16-04
Listing out the main commands. At first try to update the ubuntu version from terminal with the command :
$ sudo apt-get update
Please note that on first time run of the above command I faced an issue and the error was like below
E: Could not get lock /var/lib/dpkg/lock - open (11 Resource temporarily unavailable)
E: Unable to lock the administration directory (/var/lib/dpkg/) is another process using it?
I was able to resolve the above error with the following commands
Remove your
/var/lib/dpkg/lock file and force package reconfiguration. |
And the steps are explained above which I copied from stackoverflow.
Once your ubuntu is updated now install pip and python dev as follows
$ sudo apt-get -y install python-pip python-dev
Once done you can check the installation location
$pip --version
pip 8.1.1 from /usr/lib/python2.7/dist-packages (python 2.7)
$python --version
Python 2.7.12
$whereis python2.7
python2: /usr/bin/python2.7-config /usr/bin/python2 /usr/bin/python2.7 /usr/lib/python2.7 /etc/python2.7 /usr/local/lib/python2.7 /usr/include/python2.7 /usr/share/man/man1/python2.1.gz
once done, we can proceed with installation of ipython and notebook
Since we are working from ssh so notebook might not work, but here are the steps below for its installation.
$ sudo apt-get -y install ipython ipython-notebook
$ sudo apt-get -y install ipython ipython-notebook
- sudo -H pip install jupyter
You are using pip version 8.1.1, however version 8.1.2 is available.
You should consider upgrading via the 'pip install --upgrade pip' command.
If so, you can use pip to upgrade pip to the latest version:
- sudo -H pip install --upgrade pip
- sudo -H pip install jupyter
Try out by typing
$ jupyter notebook
Installation done
We need to now copy each the passphrase to each of the worker node machines and the generic command for that is as below
You can get the Ip address of the remote machine by typing ifconfig from the terminal. So in our case that command is as follows
Output-
kghosh@DVY1L32-ubuntu-1:~$ ssh-copy-id -i ~/.ssh/id_rsa.pub kghosh@192.168.1.164
/usr/bin/ssh-copy-id: INFO: Source of key(s) to be installed: "/home/kghosh/.ssh/id_rsa.pub"
The authenticity of host '192.168.1.164 (192.168.1.164)' can't be established.
ECDSA key fingerprint is SHA256:jpsnVaUNquTNRqiuKqLGGyR3AYTp/tqIneCJf5ZWcDI.
Are you sure you want to continue connecting (yes/no)? y
Please type 'yes' or 'no': yes
/usr/bin/ssh-copy-id: INFO: attempting to log in with the new key(s), to filter out any that are already installed
/usr/bin/ssh-copy-id: INFO: 1 key(s) remain to be installed -- if you are prompted now it is to install the new keys
kghosh@192.168.1.164's password:
Number of key(s) added: 1
Setting up worker node/cluster
Login to the worker vm and install the open ssh server with the following commands
At first we will install open-ssh server on the worker node so that it can remotely logged into from the master node. So open a terminal on the worker node and then type the following installation commands
# On Worker nodes, we install SSH Server so that we can access this node from Master nodesudo apt-get install openssh-server
After installing the SSH server on worker node, generate a key from the master so that master can access the worker node without asking for a password.
On the master node, we generate rsa key for remote access to the worker node.
# On Master node, we generate a rsa key for remote accessssh-keygen
After the above command just keep pressing enter until the pass phrase gets generated
kghosh@DVY1L32-ubuntu-1:~$ ssh-keygen
Generating public/private rsa key pair.
Enter file in which to save the key (/home/kghosh/.ssh/id_rsa):
Created directory '/home/kghosh/.ssh'.
Enter passphrase (empty for no passphrase):
Enter same passphrase again:
Your identification has been saved in /home/kghosh/.ssh/id_rsa.
Your public key has been saved in /home/kghosh/.ssh/id_rsa.pub.
The key fingerprint is:
SHA256:B8GWGJ+vSRKSr6L+Y+QeBvGr5Rljie4Crr+Lztc4csM kghosh@DVY1L32-ubuntu-1
The key's randomart image is:
+---[RSA 2048]----+
| .+.. |
| ...+o |
| . o ..+ |
| o o . o |
| . . o S o |
|. o.o. o + |
|o.=X+ o |
|+=*E=. |
|XO@B+ |
+----[SHA256]-----+
The Terminal will list out the passphrase file where it got saved as in the screen shot above.
We need to now copy each the passphrase to each of the worker node machines and the generic command for that is as below
# To access Worker ncd odes via SSH without providing password (just use our rsa key), we need to copy our public key to each Worker nodessh-copy-id -i ~/.ssh/id_rsa.pub <username_on_remote_machine>@<IP_address_of_that_remote_machine>You can get the Ip address of the remote machine by typing ifconfig from the terminal. So in our case that command is as follows
ssh-copy-id -i ~/.ssh/id_rsa.pub kghosh@192.168.1.64Output-
kghosh@DVY1L32-ubuntu-1:~$ ssh-copy-id -i ~/.ssh/id_rsa.pub kghosh@192.168.1.164
/usr/bin/ssh-copy-id: INFO: Source of key(s) to be installed: "/home/kghosh/.ssh/id_rsa.pub"
The authenticity of host '192.168.1.164 (192.168.1.164)' can't be established.
ECDSA key fingerprint is SHA256:jpsnVaUNquTNRqiuKqLGGyR3AYTp/tqIneCJf5ZWcDI.
Are you sure you want to continue connecting (yes/no)? y
Please type 'yes' or 'no': yes
/usr/bin/ssh-copy-id: INFO: attempting to log in with the new key(s), to filter out any that are already installed
/usr/bin/ssh-copy-id: INFO: 1 key(s) remain to be installed -- if you are prompted now it is to install the new keys
kghosh@192.168.1.164's password:
Number of key(s) added: 1
Next, copy this file from the master to the the slave machine using
scp <source> <destination>
To copy a file from
B to A while logged into B:scp .ssh/id_rsa.pub kghosh@192.168.1.164:/home/kaushik/.ssh/id_rsa.pub
and then from slave machine run:
$ cat ~/.ssh/id_dsa.pub >> ~/.ssh/authorized_keys
$ chmod 644 ~/.ssh/authorized_keys
Spark Configuration
Go to the config folder of spark in the master machine and copy the file slaves.template to slaves and specify the ip address of the slave machine
plasparkadmin@pal-dev-vm-01:~/work$ cd spark-2.1.0-bin-hadoop2.7/
plasparkadmin@pal-dev-vm-01:~/work/spark-2.1.0-bin-hadoop2.7$ ls
bin data jars licenses python README.md sbin
conf examples LICENSE NOTICE R RELEASE yarn
plasparkadmin@pal-dev-vm-01:~/work/spark-2.1.0-bin-hadoop2.7$ cd conf/
plasparkadmin@pal-dev-vm-01:~/work/spark-2.1.0-bin-hadoop2.7/conf$ ls
docker.properties.template metrics.properties.template spark-env.sh.template
fairscheduler.xml.template slaves.template
log4j.properties.template spark-defaults.conf.template
plasparkadmin@pal-dev-vm-01:~/work/spark-2.1.0-bin-hadoop2.7/conf$ cp slaves.template slaves
plasparkadmin@pal-dev-vm-01:~/work/spark-2.1.0-bin-hadoop2.7/conf$ ls
docker.properties.template slaves
fairscheduler.xml.template slaves.template
log4j.properties.template spark-defaults.conf.template
metrics.properties.template spark-env.sh.template
plasparkadmin@pal-dev-vm-01:~/work/spark-2.1.0-bin-hadoop2.7/conf$ vi slaves
plasparkadmin@pal-dev-vm-01:~/work/spark-2.1.0-bin-hadoop2.7/conf$ vi slaves
plasparkadmin@pal-dev-vm-01:~/work/spark-2.1.0-bin-hadoop2.7/conf$
Worker Configurations
For each worker from the master copy the jdk and spark binary folder recursively using scp command
plasparkadmin@pal-dev-vm-01:~/work$ scp -r jdk1.8.0_121/ plasparkadmin@13.85.14.23:/home/plasparkadmin/work/
plasparkadmin@pal-dev-vm-01:~/work$ scp -r spark-2.1.0-bin-hadoop2.7/ plasparkadmin@13.85.14.23:/home/plasparkadmin/work/
Once the copy is done, we will need to setup the Java Home path and the Spark and Hadoop Home paths just like we did in the master.
Just like in the master we can directly write set the paths in the terminal on the worker.
Python Dev Tools on the Worker
Install python on the worker, so that we can submit pyspark jobs.
$ sudo apt-get update
$ sudo apt-get -y install python-pip python-dev

Installing Remote Desktop to Master and Minimum GUI
Most the steps are copied from the link in the reference. These are the steps I did below to enable remote desktop and load the spark master ui.
First thing to enable is the Port for Remote Desktop Connection on Azure. So login to Azure portal and under the virtual network of the Master VM, Enable Port TCP :3389.

Login to the master node using putty, first install the version of ubuntu desktop that support rdp and xfce.
Install
xfce, use:
Copy
Code
#sudo apt-get install xubuntu-desktop
Then enable
xfce, use:
Copy
Code
#echo xfce4-session >~/.xsession
For Ubuntu to install xrdp use:
Copy
Code
#sudo apt-get install xrdp
Edit the config file
/etc/xrdp/startwm.sh, use:
Copy
Code
#sudo vi /etc/xrdp/startwm.sh
Add line
xfce4-session before the line /etc/X11/Xsession.
Restart xrdp service, use:
Copy
Code
#sudo service xrdp restart
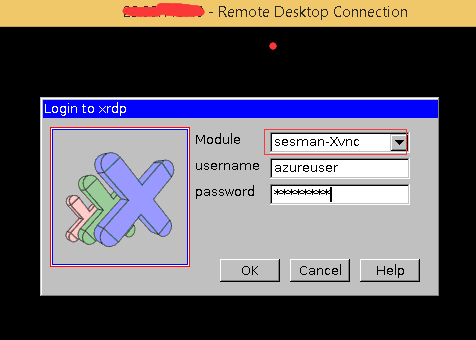
Connect your Linux VM from a Windows machine
In a Windows machine, start the remote desktop client(Remote Desktop Connection), input your Linux VM DNS name, or go to
Dashboard of your VM in Azure classic portal and click Connect to connect your Linux VM, you will see below login window:
Login with the
user & password of your Linux VM, and enjoy the Remote Desktop from your Microsoft Azure Linux VM right now!Sample Python Application and PySpark Submission
SSH into the master and navigate to the spark home directory. Once you are there create a project folder, in our case its called kaushikpla. On the terminal type
plasparkadmin@pal-dev-vm-01:~/work/spark-2.1.0-bin-hadoop2.7$ cd kaushikpla/
plasparkadmin@pal-dev-vm-01:~/work/spark-2.1.0-bin-hadoop2.7$ vi plaPythonApp.py
Copy paste the below pyspark code from local computer
from pyspark import SparkConf
from pyspark import SparkContext
from pyspark.sql import SQLContext
from pyspark.sql.types import *
def main():
sc = SparkContext()
sqlContext = SQLContext(sc)
eventPath = "wasb://sparkjob@pladevstorage.blob.core.windows.net/input/events.log"
eventsJson = sqlContext.read.json(eventPath)
resultDF = eventsJson.groupBy(['EventDateTime', 'EventTypeName', 'PN']).count()
resultDF.coalesce(1).write.format('csv').options(header='true').save('wasb://sparkjob@pladevstorage.blob.core.windows.net/outputvmcsv')
resultDF.coalesce(1).write.format('json').save('wasb://sparkjob@pladevstorage.blob.core.windows.net/outputvmjson')
if __name__ == "__main__":
main()
Once that is done, go back to the spark home directory and submit the job with the below command.
plasparkadmin@pal-dev-vm-01:~/work/spark-2.1.0-bin-hadoop2.7$ ./bin/spark-submit --master spark://10.0.0.4:7077 kaushikpla/plaPythonApp.py
Install Microsoft SQL JDBC Driver
In order to connect to SQL Server, we need to install Microsoft SQL JDBC Driver. So download the latest driver from the link below
https://www.microsoft.com/en-us/download/details.aspx?displaylang=en&id=11774
Download the file : sqljdbc_6.0.8112.100_enu.tar.gz and unpack it using the following command
plasparkadmin@pal-dev-vm-01:~/work$ gzip -d sqljdbc_6.0.8112.100_enu.tar.gz
plasparkadmin@pal-dev-vm-01:~/work$ tar -xf sqljdbc_6.0.8112.100_enu.tar
plasparkadmin@pal-dev-vm-01:~/work$ tar -xf sqljdbc_6.0.8112.100_enu.tar
Once its extracted, we proceed to adding it to the classpath of spark and write a sample code to test.
To add the driver class path, I added the *.jar file to the $SPARK_HOME\conf\spark-defaults.conf
If there are already entries then put a comma and then add the entry below
/home/plasparkadmin/work/sqljdbc_6.0/enu/jre8/sqljdbc42.jar
So my final spark-defaults.conf looked like below
spark.jars=/home/plasparkadmin/work/spark-2.1.0-bin-hadoop2.7/lib/hadoop-azure-2.7.0.jar,/home/plasparkadmin/work/spark-2.1.0-bin-hadoop2.7/lib/azure-storage-2.0.0.jar,/home/plasparkadmin/work/sqljdbc_6.0/enu/jre8/sqljdbc42.jar
scp the sqljdbc folder to the workers and add the same class path in each workers and restart the cluster.
Testing Connection to SQL Server
Write the below sample application and save it and run it with the execution command below
plasparkadmin@pal-dev-vm-01:~/work/spark-2.1.0-bin-hadoop2.7$ ./bin/spark-submit --driver-class-path /home/plasparkadmin/work/sqljdbc_6.0/enu/jre8/sqljdbc42.jar --master spark://10.0.0.4:7077 kaushikpla/plaRollupToSQL.py
please note above that I have added the driver class path in the execution command because it was not able to find the driver without that.
from pyspark import SparkConf
from pyspark import SparkContext
from pyspark.sql import SQLContext
def main():
conf = (SparkConf().setAppName("data_import"))
sc = SparkContext(conf = conf)
#sc = SparkContext()
sqlContext = SQLContext(sc)
jdbcDF = sqlContext.read.format("jdbc").option("url", "jdbc:sqlserver://svr.database.windows.net;databaseName=dbname").option("dbtable", "dbo.mytable").option("user", "username").option("password", "password").load()
# Displays the content of the DataFrame to stdout ...first 10 rows
jdbcDF.show(10)
if __name__ == "__main__":
main()
viewpath = "wasb://ap1rpt@dawstopla.blob.core.windows.net/events_dt.csv"
df = edf.select('ET', 'EventCount').groupBy('ET').agg(func.sum("EventCount")).withColumnRenamed('sum(EventCount)', 'EventCount')
df.withColumn('EventDate', lit(eventDate)).coalesce(1).write.format("csv").mode("overwrite").options(header='true').save(viewpath)
df.withColumn('EventDate', lit(eventDate)).write.jdbc(url="jdbc:sqlserver://server.database.windows.net;databaseName=mydb", table="dbo.mytable", mode="append", properties={"user": "username", "password":"password"})
*For the above to wotk, please make sure the select columns and the database column names in the database are same. mode = "append" will mean it will append to the existing data that is there in the database.
from pyspark import SparkContext
from pyspark.sql import SQLContext
def main():
conf = (SparkConf().setAppName("data_import"))
sc = SparkContext(conf = conf)
#sc = SparkContext()
sqlContext = SQLContext(sc)
jdbcDF = sqlContext.read.format("jdbc").option("url", "jdbc:sqlserver://svr.database.windows.net;databaseName=dbname").option("dbtable", "dbo.mytable").option("user", "username").option("password", "password").load()
# Displays the content of the DataFrame to stdout ...first 10 rows
jdbcDF.show(10)
if __name__ == "__main__":
main()
Writing to Azure SQL Database
Just like you can read from Azure SQL, you can also write to Azure SQL directly from the dataframe, a sample code as below
df = edf.select('ET', 'EventCount').groupBy('ET').agg(func.sum("EventCount")).withColumnRenamed('sum(EventCount)', 'EventCount')
df.withColumn('EventDate', lit(eventDate)).coalesce(1).write.format("csv").mode("overwrite").options(header='true').save(viewpath)
df.withColumn('EventDate', lit(eventDate)).write.jdbc(url="jdbc:sqlserver://server.database.windows.net;databaseName=mydb", table="dbo.mytable", mode="append", properties={"user": "username", "password":"password"})
*For the above to wotk, please make sure the select columns and the database column names in the database are same. mode = "append" will mean it will append to the existing data that is there in the database.
Python Module for MSSQL Client
There is a python module for MsSQL client : http://www.pymssql.org/en/stable/intro.html. To install that module do this below
sudo apt-get install freetds-dev
sudo pip install pymssql
Once installed we will run a spark job to write and read from database. I have not used it yet.