Search This Blog

Thursday, December 17, 2020

Installing Docker Tools on Ununtu VM on Azure to run Superset

 Installing Docker Tools on Ubuntu VMs on Azure to Run Superset

As a first step, we are creating a VM on Azure through the portal. We make sure of 2 things in this example
  1. Select Ubuntu 18.04
  2. Make sure the ports 80, 443, 22, 3389 are open
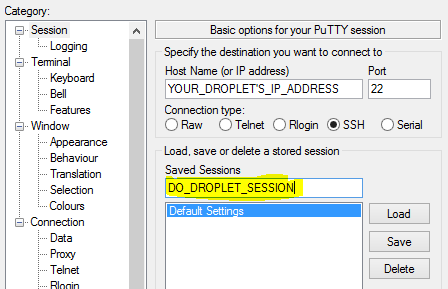
  3. Make sure the VM has a public ip address so that you can access it using Putty or other secured shell client from your local machine.
Since we are dealing with running Apache superset so we will first login and clone the repository and change the admin password

Cloning Superset from repository and change Default Password

Clone the official repository using
$ git clone https://github.com/apache/incubator-superset.git

The default password is "admin" so we can change it so that no one else knows it

$ cd incubator-superset
$ cd docker
$ vi docker-init.sh
#change the line to your desired password ADMIN_PASSWORD="admin"

Installing Docker

I have followed instructions listed on the url : https://docs.docker.com/engine/install/ubuntu/ using the method "install using the repository". Majority of the steps listed here will be from the url listed above and purpose of documenting this is to note down how to resolve the errors while doing a docker compose.

#SET UP THE REPOSITORY
#Update the apt package index and install packages to allow apt to use a repository over HTTPS:

$ sudo apt-get update

$ sudo apt-get install \
    apt-transport-https \
    ca-certificates \
    curl \
    gnupg-agent \
    software-properties-common
Add Docker’s official GPG key:

$ curl -fsSL https://download.docker.com/linux/ubuntu/gpg | sudo apt-key add -

#Verify that you now have the key with the fingerprint 9DC8 5822 9FC7 DD38 854A  E2D8 8D81 803C 0EBF CD88, by searching for the last 8 characters of the fingerprint.

$ sudo apt-key fingerprint 0EBFCD88

pub   rsa4096 2017-02-22 [SCEA]
      9DC8 5822 9FC7 DD38 854A  E2D8 8D81 803C 0EBF CD88
uid           [ unknown] Docker Release (CE deb) <docker@docker.com>
sub   rsa4096 2017-02-22 [S]

Use the following command to set up the stable repository. To add the nightly or test repository, add the word nightly or test (or both) after the word stable in the commands below. Learn about nightly and test channels.

$ sudo add-apt-repository \
   "deb [arch=amd64] https://download.docker.com/linux/ubuntu \
   $(lsb_release -cs) \
   stable"

INSTALL DOCKER ENGINE

#Update the apt package index, and install the latest version of Docker Engine and containerd, or go to #the next step to install a specific version:

 $ sudo apt-get update
 $ sudo apt-get install docker-ce docker-ce-cli containerd.io

To install a specific version of Docker Engine, list the available versions in the repo, then select and install:

a. List the versions available in your repo:

$ apt-cache madison docker-ce

b. Install a specific version using the version string from the second column, for example, 5:18.09.1~3-0~ubuntu-xenial.

$ sudo apt-get install docker-ce=<VERSION_STRING> docker-ce-cli=<VERSION_STRING> containerd.io

In my case it was 
$ sudo apt-get install docker-ce=5:20.10.1~3-0~ubuntu-bionic docker-ce-cli=5:20.10.1~3-0~ubuntu-bionic containerd.io

Verify that Docker Engine is installed correctly by running the hello-world image.

$ sudo docker run hello-world

Install Docker Compose

You can install docker-compose using the command below
$ sudo apt install docker-compose

Compose Superset

we will try to compose the downloaded superset by the command below
$ docker-compose up

On running the above command you will face issue where it will complain about the version of the docker-compose.yaml. In order to resolve it, please change the version to 2.2

After making the above change when you run the docker-compose again it will still complain and the error should be "Couldn't connect to docker daemon". In order to resolve this we need to do the following

$export DOCKER_HOST=internalIp of the VM
$ sudo usermod -aG docker <<username>>
$ service docker restart
$ sudo docker-compose up -d

The -d option is to run it in a detached mode so even if your terminal session closes the service would still keep running. When installation is complete and the services are running you can check what are the services running using the command below

$docker-compose ps

:~/incubator-superset$ docker-compose ps
WARNING: The CYPRESS_CONFIG variable is not set. Defaulting to a blank string.
        Name                   Command           State            Ports
--------------------------------------------------------------------------------
superset_app            /usr/bin/docker-         Up       8080/tcp,
                        entrypoint ...                    0.0.0.0:8088->8088/tcp
superset_cache          docker-entrypoint.sh     Up       127.0.0.1:6379->6379/t
                        redis ...                         cp
superset_db             docker-entrypoint.sh     Up       127.0.0.1:5432->5432/t
                        postgres                          cp
superset_init           /usr/bin/docker-         Exit 0
                        entrypoint ...
superset_node           docker-entrypoint.sh     Up
                        /app/ ...
superset_tests_worker   /usr/bin/docker-         Exit 1
                        entrypoint ...
superset_worker         /usr/bin/docker-         Up       8080/tcp
                        entrypoint ...

Now you should be able to access the superset instance by http://{Private of Public IP}:8088 and login using the username = admin and password = <<password set in docker-init.sh>>

In order to stop the services from running use the command below

$ docker-compose stop 
In order to remove the container 
$ docker-compose down

Wednesday, July 29, 2020

Enabling remote desktop connection on ubuntu on Azure

Enable remote desktop connection on ubuntu VM on azure

There may be instances when you will need to setup a Linux/Ubuntu VM on a public cloud like azure do quickly do some Poc instead of bothering your own local machine which may not be linux based.

Create Ubuntu (v 18 in my case) VM (Resource Managed)
ssh into VM with Putty
sudo apt-get update
sudo apt-get install lxde
sudo apt-get install xrdp
echo startlxde > ~/.xsession
sudo /etc/init.d/xrdp start
open port 3389 in Azure firewall
RDP to Ubuntu desktop :)

Steps to Open Port 3389 on VM

  1. Sign in to the Azure portal.
  2. In Virtual Machines, select the VM that has the problem.
  3. In Settings, select Networking. 
  4. In Inbound port rules, check whether the port for RDP is set correctly. The following is an example of the configuration:
    1. Priority: 300 (set 310 if 300 is already taken)
    2. Name: Port_3389
    3. Port(Destination): 3389
    4. Protocol: TCP
    5. Source: Any
    6. Destinations: Any
    7. Action: Allow
All Set!

Friday, December 22, 2017

Creating Azure SQL Login and Assigning them permission

Creating Read-Only Users on Azure SQL

If you have admin rights please follow the following steps to create a read-only or a user with login who can just run select queries on azure sql.

1. Login to the Database Server as Admin and Select Master Database and run the following queries

--This will create a Login on the Server
CREATE LOGIN READ_USER WITH PASSWORD = 'StrongPassword';

2. Create User in the Database where the Read-Only permission is required

--Select the Database where you will be assigning the Read-only permission and run below command
CREATE USER READ_USER FROM LOGIN READ_USER ;

3. Assign db_datareader persmission to the user on the database

--Select the Database where you will be assigning read permission and run below query
EXEC sp_addrolemember 'db_datareader', 'READ_USER ';

Reference : https://azure.microsoft.com/en-us/blog/adding-users-to-your-sql-azure-database/

Saturday, October 22, 2016

Linking Jupyter Notebook with Spark on ubuntu 16

Starting Jupyter Notebook with Apache Spark

Required Variable Setup

Open a terminal and enter command to edit the profile variable

$ gedit ~/.bashrc

Once the window opens, enter the following two lines

export PYSPARK_DRIVER_PYTHON=ipython
export PYSPARK_DRIVER_PYTHON_OPTS="notebook"

Once done hit save and exit the terminal.

Running the Notebook with Spark Cluster

Assuming that its a local standalone cluster, we can start it using the following commands

$ pyspark --master local[2]

Monday, October 17, 2016

How To Set Up a Jupyter Notebook to Run IPython on Ubuntu 16.04

Copied from : https://www.digitalocean.com/community/tutorials/how-to-set-up-a-jupyter-notebook-to-run-ipython-on-ubuntu-16-04

Introduction

IPython is an interactive command-line interface to Python. Jupyter Notebook offers an interactive web interface to many languages, including IPython.
This article will walk you through setting up a server to run Jupyter Notebook as well as teach you how to connect to and use the notebook. Jupyter notebooks (or simply notebooks) are documents produced by the Jupyter Notebook app which contain both computer code (e.g. Python) and rich text elements (paragraph, equations, figures, links, etc.) which aid in presenting reproducible research.
By the end of this guide, you will be able to run Python 2.7 code using Ipython and Jupyter Notebook running on a remote server. For the purposes of this tutorial, Python 2 (2.7.x) is used since many of the data science, scientific computing, and high-performance computing libraries support 2.7 and not 3.0+.

Prerequisites

To follow this tutorial, you will need the following:
All the commands in this tutorial should be run as a non-root user. If root access is required for the command, it will be preceded by sudo. Initial Server Setup with Ubuntu 16.04 explains how to add users and give them sudo access.

Step 1 — Installing Python 2.7 and Pip

In this section we will install Python 2.7 and Pip.
First, update the system's package index. This will ensure that old or outdated packages do not interfere with the installation.
  • sudo apt-get update
Next, install Python 2.7, Python Pip, and Python Development:
  • sudo apt-get -y install python2.7 python-pip python-dev
Installing python2.7 will update to the latest version of Python 2.7, and python-pip will install Pip which allows us to manage Python packages we would like to use. Some of Jupyter’s dependencies may require compilation, in which case you would need the ability to compile Python C-extensions, so we are installing python-dev as well.
To verify that you have python installed:
  • python --version
This will output:
Output
Python 2.7.11+
Depending on the latest version of Python 2.7, the output might be different.
You can also check if pip is installed using the following command:
  • pip --version
You should something similar to the following:
Output
pip 8.1.1 from /usr/lib/python2.7/dist-packages (python 2.7)
Similarly depending on your version of pip, the output might be slightly different.

Step 2 — Installing Ipython and Jupyter Notebook

In this section we will install Ipython and Jupyter Notebook.
First, install Ipython:
  • sudo apt-get -y install ipython ipython-notebook
Now we can move on to installing Jupyter Notebook:
  • sudo -H pip install jupyter
Depending on what version of pip is in the Ubuntu apt-get repository, you might get the following error when trying to install Jupyter:
Output
You are using pip version 8.1.1, however version 8.1.2 is available. You should consider upgrading via the 'pip install --upgrade pip' command.
If so, you can use pip to upgrade pip to the latest version:
  • sudo -H pip install --upgrade pip
Upgrade pip, and then try installing Jupyter again:
  • sudo -H pip install jupyter

Step 3 — Running Jupyter Notebook

You now have everything you need to run Jupyter Notebook! To run it, execute the following command:
  • jupyter notebook
If you are running Jupyter on a system with JavaScript installed, it will still run, but it might give you an error stating that the Jupyter Notebook requires JavaScript:
Output
Jupyter Notebook requires JavaScript. Please enable it to proceed. ...
To ignore the error, you can press Q and then press Y to confirm.
A log of the activities of the Jupyter Notebook will be printed to the terminal. When you run Jupyter Notebook, it runs on a specific port number. The first notebook you are running will usually run on port 8888. To check the specific port number Jupyter Notebook is running on, refer to the output of the command used to start it:
Output
[I NotebookApp] Serving notebooks from local directory: /home/sammy [I NotebookApp] 0 active kernels [I NotebookApp] The Jupyter Notebook is running at: http://localhost:8888/ [I NotebookApp] Use Control-C to stop this server and shut down all kernels (twice to skip confirmation).
If you are running Jupyter Notebook on a local Linux computer (not on a Droplet), you can simply navigate to localhost:8888 to connect to Jupyter Notebook. If you are running Jupyter Notebook on a Droplet, you will need to connect to the server using SSH tunneling as outlined in the next section.
At this point, you can keep the SSH connection open and keep Jupyter Notebook running or can exit the app and re-run it once you set up SSH tunneling. Let's keep it simple and stop the Jupyter Notebook process. We will run it again once we have SSH tunneling working. To stop the Jupyter Notebook process, press CTRL+C, type Y, and hit ENTER to confirm. The following will be displayed:
Output
[C 12:32:23.792 NotebookApp] Shutdown confirmed [I 12:32:23.794 NotebookApp] Shutting down kernels

Step 4 — Connecting to the Server Using SSH Tunneling

In this section we will learn how to connect to the Jupyter Notebook web interface using SSH tunneling. Since Jupyter Notebook is running on a specific port on the Droplet (such as :8888, :8889 etc.), SSH tunneling enables you to connect to the Droplet's port securely.
The next two subsections describe how to create an SSH tunnel from 1) a Mac or Linux and 2) Windows. Please refer to the subsection for your local computer.

SSH Tunneling with a Mac or Linux

If you are using a Mac or Linux, the steps for creating an SSH tunnel are similar to the How To Use SSH Keys with DigitalOcean Droplets using Linux or Mac guide except there are additional parameters added in the ssh command. This subsection will outline the additional parameters needed in the ssh command to tunnel successfully.
SSH tunneling can be done by running the following SSH command:
  • ssh -L 8000:localhost:8888 your_server_username@your_server_ip
The ssh command opens an SSH connection, but -L specifies that the given port on the local (client) host is to be forwarded to the given host and port on the remote side (Droplet). This means that whatever is running on the second port number (i.e. 8888) on the Droplet will appear on the first port number (i.e. 8000) on your local computer. You should change 8888 to the port which Jupyter Notebook is running on. Optionally change port 8000 to one of your choosing (for example, if 8000 is used by another process). Use a port greater or equal to 8000 (ie 8001, 8002, etc.) to avoid using a port already in use by another process. server_username is your username (i.e. sammy) on the Droplet which you created and your_server_ip is the IP address of your Droplet. For example, for the username sammy and the server address 111.111.111.111, the command would be:
  • ssh -L 8000:localhost:8888 sammy@111.111.111.111
If no error shows up after running the ssh -L command, you can run Jupyter Notebook:
  • jupyter notebook
Now, from a web browser on your local machine, open the Jupyter Notebook web interface with http://localhost:8000 (or whatever port number you chose).

SSH Tunneling with Windows and Putty

If you are using Windows, you can also easily create an SSH tunnel using Putty as outlined in How To Use SSH Keys with PuTTY on DigitalOcean Droplets (Windows users).
First, enter the server URL or IP address as the hostname as shown:
Set Hostname for SSH Tunnel
Next, click SSH on the bottom of the left pane to expand the menu, and then click Tunnels. Enter the local port number to use to access Jupyter on your local machine. Choose 8000 or greater (ie 8001, 8002, etc.) to avoid ports used by other services, and set the destination as localhost:8888 where :8888 is the number of the port that Jupyter Notebook is running on. Now click the Add button, and the ports should appear in the Forwarded ports list:
Forwarded ports list
Finally, click the Open button to connect to the server via SSH and tunnel the desired ports. Navigate to http://localhost:8000 (or whatever port you chose) in a web browser to connect to Jupyter Notebook running on the server.

Step 5 — Using Jupyter Notebook

This section goes over the basics of using Jupyter Notebook. By this point you should have Jupyter Notebook running, and you should be connected to it using a web browser. Jupyter Notebook is very powerful and has many features. This section will outline a few of the basic features to get you started using the notebook. Automatically, Jupyter Notebook will show all of the files and folders in the directory it is run from.
To create a new notebook file, select New > Python 2 from the top right pull-down menu:
Create a new Python 2 notebook
This will open a notebook. We can now run Python code in the cell or change the cell to markdown. For example, change the first cell to accept Markdown by clicking Cell > Cell Type > Markdown from the top navigation bar. We can now write notes using Markdown and even include equations written in LaTeX by putting them between the $$ symbols. For example, type the following into the cell after changing it to markdown:
# Simple Equation

Let us now implement the following equation:
$$ y = x^2$$

where $x = 2$
To turn the markdown into rich text, press CTRL+ENTER, and the following should be the results:
results of markdown
You can use the markdown cells to make notes and document your code. Let's implement that simple equation and print the result. Select Insert > Insert Cell Below to insert and cell and enter the following code:
x = 2
y = x*x
print y
To run the code, press CTRL+ENTER. The following should be the results:
simple equation results
You now have the ability to include libraries and use the notebook as you would with any other Python development environment!

Conclusion

Congratulations! You should be now able to write reproducible Python code and notes using markdown using Jupyter notebook running on a Droplet. To get a quick tour of Jupyter notebook, select Help > User Interface Tour from the top navigation menu.

Thursday, August 25, 2016

R Script arguments from Command Line

Passing RScript arguments from Command Line

There may be situations where you might want to execute R scripts from command line and passing appropriate arguments as batch. So here is an example below

C:\Users\UserName\Documents\>
"C:\Program Files\R\R-3.3.0\bin\RScript.exe" args.R 2016-08-01 28 1 30 > args.t

In the above I have specified the location of the RScript.exe on my local computer and args.R is the R script that I want to run from command line and the arguments are 2016-08-01 which is a Date in the format yyyy-mm-dd, then 28 and then 1 and 30 and the result of the execution will get saved in args.txt file which is the output of the execution.

Here is the sample R script code below

#READ THE ARGUMENTS
args <- commandArgs(TRUE)

# test if there is at least one argument: if not, return an error
if (length(args)==0) {
  stop("First parameter is a required argumenst.n", call.=FALSE)

print(args)

#GETTING ARGUMENT OF THE R SCRIPT.
startDate <- as.Date(args[1])
sId <- eval(parse(text=args[2]))
min <- eval(parse(text=args[3]))
max <- eval(parse(text=args[4]))

#write the variables as observations of a dataframe
columnNames <- c('sId', 'startDate', 'min', 'max')
columnValues <- c(sId, startDate, min, max)
df = data.frame(columnNames, columnValues)
str(df)
print(df)
write.csv(df, file = "C:/args.csv", row.names=F)

The data frame created above gets saved as a csv file for review. Please note internally Date is represented as integer in R.

Wednesday, August 17, 2016

Self-Signed Certificates with Microsoft Enhanced RSA and AES Cryptographic Provider

Creating Enhanced SHA256 self-signed certificates

There are 2 options to create self-signed certificates very easily

using windows makecert

The following command can be run from the command prompt to create a self-signed certificate. Based on location of the makecert.exe on you machine, the path might differ. I am using a Windows 8.1
"C:\Program Files (x86)\Windows Kits\8.1\bin\x86\makecert.exe" -n "CN=Local" -r -pe -a sha256 -len 2048 -cy authority -e 03/03/2017 -sv Local.pvk Local.cer


"C:\Program Files (x86)\Windows Kits\8.1\bin\x86\pvk2pfx.exe" -pvk Local.pvk -spc Local.cer -pfx Local.pfx -po MyPassword -sy 24

using openSSL

you can use openSSL that comes with Apache Webserver to get the same thing done as follows

openssl.exe req -x509 -nodes -sha256 -days 3650 -subj "/CN=Local" -newkey rsa:2048 -keyout Local.key -out Local.crt

openssl.exe pkcs12 -export -in Local.crt -inkey Local.key -CSP "Microsoft Enhanced RSA and AES Cryptographic Provider" -out Local.pfx

Difference Between Above two

One major and most important difference between the 2 above is makecert is not able to create the certificate file with CSP of 24 as provided as provided as parameter so while using this *pfx file to sign any XML as SHA256 will give exception like "Invalid Algorithm Specified" because the CSP value remains 1 instead of 24.

The one created by Open SSL will come out with correct CSP value and will give any errors.

Check Keys of Generated Certificate

You can write a small test program to test the Keys generated by the certificates in the above 2 methods.

class Program
    {
        static void Main(string[] args)
        {
            var x509Certificate = new X509Certificate2(@"Local.pfx", 
                "LocalSTS", X509KeyStorageFlags.Exportable);
            Console.WriteLine(x509Certificate.ToString(true));
            Console.ReadLine();
        }
    }